In Q4 2025, the fastest way to achieve precise construction measurements is to control datums, use the right instrument for the tolerance, verify daily (two-tape/backsight checks), and document methods so results are repeatable and auditable.
For a small site or domestic project, budget £120–£450 inc VAT for measurement gear and checks (calibrated tape, laser distance meter, levels), or £80–£150/day to hire a rotating laser/total station if tighter tolerances or set-out is needed. Region: UK (England). Base date: Q4 2025. VAT: prices inc VAT. Units: mm, m, m². GBP.
This post is part of our Estimating & Take-off series. For the full guide, read The Ultimate Guide to Understanding Home Renovation Estimates.
Need a quick check on quantities or set-out? Request a Custom Estimate we can validate drawings and measurement assumptions before you place orders.
- Cost Summary
- Assumptions and Methodology
- Top 10 Tips for Precise Construction Measurements
- Detailed Cost Breakdown
- Programme and Durations
- Regional Variation
- Inclusions and Exclusions
- Risks and Allowances
- FAQs
- Sources
- Key Facts & Assumptions (At a Glance)
Cost Summary (Q4 2025, inc VAT)
Indicative small-project costs for accurate measuring and set-out. Use the ranges to plan prelims and avoid rework:
- Basic kit: Class I tape (£8–£25), laser distance meter (£60–£350), 600–1200mm spirit level (£15–£60), chalk line/marking paint (£5–£20).
- Advanced kit (buy): Cross-line/rotating laser £150–£500; auto/optical level £120–£300; digital level £300–£850.
- Hire (per day): Rotating laser £20–£40; auto/optical level £15–£30; total station £80–£150; GNSS rover £60–£120.
- Software: PDF take-off £25–£90/month; mobile forms/CDE apps £10–£35/user/month.
- Third-party support: Site engineer/measured surveyor £250–£500/day depending on location and spec.
Assumptions and Methodology
Approach: Rates reflect typical UK trade purchase/hire in Q4 2025 for small sites and domestic projects. VAT assumed inc. Units mm/m/m². We map practices to RICS NRM (measurement rules and prelims), RIBA information stages, and CDM dutyholder responsibilities (competence and planning).
What “precision” means here: Selecting instruments to match specified tolerances, controlling datums and environment, and recording methods so measurements are repeatable and defensible through the job and at handover.
Top 10 Tips for Precise Construction Measurements
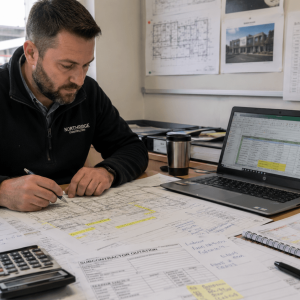
1) Start with a fixed project datum and grid
Agree a benchmark (BM) and grid before works. Lock it in the drawings and on site (pins/paint). Record coordinates and elevations on your setting-out plan.
2) Choose the instrument to match the tolerance
Use Class I tapes for fabrication, laser distance meters for interior take-offs, rotating lasers for level control, and total stations/GNSS for structural set-out. Do not over- or under-spec.
3) Verify daily: two-tape & backsight checks
Check tapes against a known length; verify levels by backsight/foresight; close traverses on themselves. Log results in a simple QA sheet.
4) Control the environment
Measure in stable conditions where possible. Note temperature, avoid sag on long tapes, brace winds on tripods, and keep lenses/reflectors clean and dry.
5) Measure to the right face
Be explicit: to face of structural wall, finish, or centreline? Document it on sketches. Consistency prevents cumulative errors across trades.
6) Keep datums consistent across drawings, set-out and as-built
Use the same vertical and horizontal datums everywhere. Any change requires a coordinated revision and a clear site briefing.
7) Triangulate and cross-check
Where possible, measure with two independent methods (e.g., laser + tape; level + laser). Differences over tolerance trigger a re-measure.
8) Manage versions and naming
Put drawings and measurement records in a shared CDE. Use disciplined file names and revision control so crews always have the latest issued set.
9) Capture evidence
Attach photos, annotated sketches and instrument screenshots to your records. This creates a defendable audit trail for valuations and disputes.
10) Train the team and standardise forms
Short toolbox talks, laminated site checksheets and simple method statements raise baseline quality and reduce confusion for new starters and subcontractors.
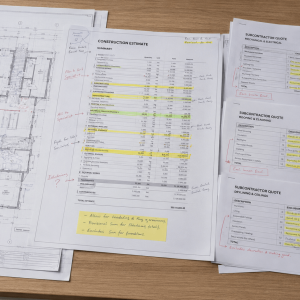
Detailed Cost Breakdown
| Scope / Item | Unit | Low £ | High £ | Typical £ | Base date | Notes |
|---|---|---|---|---|---|---|
| Class I steel tape (5–8m) | each | 8 | 25 | 15 | Q4 2025 | Prefer Class I for fabrication accuracy |
| Laser distance meter (50–100m) | each | 60 | 350 | 150 | Q4 2025 | With stake-out & Bluetooth preferred |
| Spirit level (600–1200mm) | each | 15 | 60 | 30 | Q4 2025 | Magnetic for steelwork handy |
| Cross-line / rotating laser (buy) | each | 150 | 500 | 300 | Q4 2025 | Receiver extends outdoor range |
| Optical/auto level (buy) | each | 120 | 300 | 180 | Q4 2025 | Tripod & staff set |
| Rotating laser (hire) | per day | 20 | 40 | 30 | Q4 2025 | Often cheaper weekly |
| Total station (hire) | per day | 80 | 150 | 120 | Q4 2025 | Prism, tripod, batteries included |
| GNSS rover (hire) | per day | 60 | 120 | 90 | Q4 2025 | Network corrections extra |
| PDF take-off software | per month | 25 | 90 | 45 | Q4 2025 | One user licence |
| Mobile forms/CDE app | per month | 10 | 35 | 20 | Q4 2025 | Photo capture & audit trail |
| Site engineer (freelance) | per day | 250 | 500 | 350 | Q4 2025 | Set-out, QA, as-built |
| Tape verification / replacement | each | 8 | 25 | 15 | Q4 2025 | Replace if bent/nicked |
| Calibration check sheet & training | each | 0 | 100 | 25 | Q4 2025 | In-house toolbox talk and forms |
Programme and Durations
- Domestic measured survey (3-bed house): 2–4 hours on site + 1–2 hours to process and check.
- Small extension set-out: 1–2 hours with rotating laser/level + stakes and string lines.
- Slab/pad level control: Crew can maintain target levels continuously with a receiver; confirm finished levels with as-built shots at grid intersections.
- Instrument hire lead times: Same day to 24 hours typical; book early in peak weeks.
Regional Variation
Tool hire and day rates trend higher in London and the South East (+10–20%) and lower in parts of the North and devolved nations. Availability also varies—urban depots stock more total stations/GNSS rovers than rural branches.
Inclusions and Exclusions
- Included in rates: Normal access, VAT, standard consumables (batteries/targets) where typical.
- Excluded: Network RTK subscriptions, complex control networks, night work, traffic management, specialist calibration certificates unless specified.
- Client-supplied information: Latest issued drawings, coordinate system, datums, tolerances, and any BIM/CDE access.
Risks and Allowances
- Contingency: 10–15% on small-works measurement budgets to cover repeat visits, re-measures after design changes, or replacements.
- Tolerance risk: Agree allowable tolerances in the spec (refer to project documents/NHBC/BS guidance). If not stated, set pragmatic project tolerances early.
- Rework risk: Poor control of datums and versions causes costly rework; mitigate with sign-off sketches and photo evidence.
Internal Links
For pricing and scope context beyond measurement, see our House Renovation Cost Guide, our explainer on precise construction measurements within estimates, and Estimators Online for a fast take-off check.
FAQs
What accuracy class of tape should I use?
Use Class I for fabrication and tighter tolerances; Class II is acceptable for general site checks. Replace tapes that are bent or nicked.
Laser distance meter or tape: what’s better?
Use a laser for fast, repeatable internal measurements and long runs; use a Class I tape for short critical dimensions and to verify laser readings.
When do I need a total station?
Use a total station for structural set-out, complex geometry, or where positional accuracy must be demonstrated and recorded.
Do I need to calibrate site instruments?
Yes—perform daily functional checks (backsight/two-tape). Arrange formal calibration per manufacturer or project requirements.
How do I manage drawing versions on site?
Use a common data environment (CDE) with controlled issue/revision. Brief the site team whenever a new revision is issued.
What units should I use?
Millimetres for building dimensions is standard in the UK. Be consistent and avoid mixing units on drawings and records.
How do environmental conditions affect readings?
Heat can expand tapes and affect laser performance; wind can disturb tripods and targets. Measure in stable conditions where possible.
How should I evidence my measurements?
Attach photos, annotated sketches, instrument screenshots and a signed checksheet. Store them in your CDE with the related drawing revision.
Sources
- RICS – New Rules of Measurement (NRM) and measurement guidance.
- RIBA – RIBA Plan of Work.
- HSE – CDM 2015 overview.
- RICS – Measured surveys and IPMS resources.
- BSI – Standards catalogue (e.g., Accuracy in building – BS 5606).
- NHBC – NHBC Standards (tolerances and finishes).
Key Facts & Assumptions (At a Glance)
- Scope: Site and interior measurement for set-out, QA and take-off.
- Units: mm, m, m²; prices inc VAT.
- Base date: Q4 2025; England baseline.
- Method: Instrument selection by tolerance; daily verification; controlled datums and versions; CDE record-keeping.
- Allowances: 10–15% contingency for re-measures and consumables.
- How we calculated this: Trade benchmarks for kit purchase/hire, mapped to RICS NRM prelims and common UK site practice.
Conclusion
Measure to the spec, verify, and document—those three habits protect your margin and your programme far more than expensive gear ever will.
Next step: Request a Custom Estimate to validate drawings, quantities and measurement assumptions before ordering materials.